Bunny Tail Cookies

Aren’t these cookies just the cutest?

These cookies have been floating around Pinterest and as far as I can trace, originated from pillsbury.com using store-bought cookie dough and frosting. However I wanted to make them from scratch as I was making these cute Easter cutout sugar cookies as well for our grand-baby Easter Egg Hunt this weekend, and because I am pretty particular about sugar cookies and frosting and love our old family recipe for both. This way I could make them all at once.

I’m not going to go into the tutorial on making the cookie dough and frosting. You can find the tutorials for both on my other post here, or they are included on the printable instructions (at the bottom of this post). I’ve let you know how you can make them from store-bought cookie dough and cans of frosting as well, so make sure and check out the printable recipe at the end of the post.
Once you make or purchase your sugar cookie dough, roll it out to about 1/4 inch thick. Don’t make it too thin. The beauty of sugar cookie dough is not to have them crispy but to have a nice soft bite to it.
To make the larger circle, and if you don’t have a set of these biscuit cutters lying around your house, never worry, I have suggestions for you!

I simply used a glass from my kitchen cupboard to make the larger circle or the bunny’s tush. My glass was around 3 1/4″ in diameter.

The glass worked perfectly! I cut out twelve large circles and placed them on a cookie sheet.

For the smaller circles, I ended up using this cupcake plunger that I have, but you could also use a pill bottle lid, a small shot-glass, or even the lid of a water bottle to cut thirty-six small circles for the bunny’s feet.

Place the thirty-six small circles around the large ones on your cookie sheet and pop the pan in the oven for 7-10 minutes. Start checking them at seven minutes! You really don’t want a lot of browning on them at all but a nicely-done soft sugar cookie.

Let the cookies cool on wax paper, paper towel or a cooling rack for about 10-15 minutes.
If you’re going to make your own icing, this is the time to do it! (My recipe for frosting is here.)
Now, take one of your larger circles and frost it with pink frosting.

You could also purchase a can of white frosting and a can of strawberry frosting from the store to cut time.
Stick a small marshmallow dead in the center of the bunny’s bottom and stick on two of the smaller circles for feet.

Now frost each one with white icing.

I actually think it is neater and easier to frost them individually first and stick them on (unlike the photo above where I stuck them on then frosted them).

Now take one of your larger pink candy circles and stick it on to create the upper pad of the bunny’s paw.

And stick the three smaller circle candies to form the three bottom pads of the bunny’s feet.

Continue to make the other eleven cookies and let them set on a platter or wax paper for 4-6 hours to allow the frosting to completely harden.
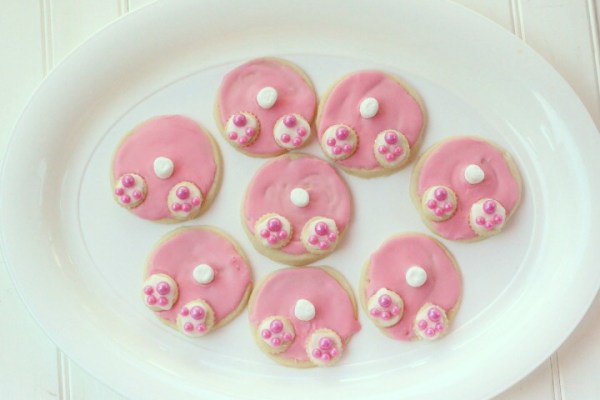
Aren’t they just the cutest little bunny booties you ever did see?

Happy Easter baking!

- 1 c. sugar
- 1 c. butter
- 1 egg
- 2 t. vanilla
- 2⅔ c. flour
- ¼ t. salt
- 12 mini-marshmallows
- 12 large candy pink balls
- 36 small candy pink balls
- ¼ c. butter (1 stick), softened
- 1 pound powdered sugar
- ¼ cup milk (to thinning quality)
- **Alternately you can use refrigerated sugar cookie dough and canned frosting (pink and white) and start Instructions where you roll out the dough
- Preheat oven to 375.
- Cream butter and sugar well.
- Add egg, salt and vanilla, beat well.
- Blend in flour gradually, about a cup at a time. Roll into a flat disk.
- Chill at least one hour. Roll out on floured surface to ⅛ inch thickness.
- Cut with cookie cutters or use a drinking glass for the large circle and a water bottle cap for the small circle. Cut 12 large circles and 36 small circles.
- Bake 7 to 10 minutes or until edges barely begin to get golden brown. Let cool one minute and remove to cooling rack or sheets of wax paper and allow to cool at least fifteen minutes before frosting.
- Can be stored in airtight container in freezer for up to one month.
- In mixing bowl beat butter and one-half cup of powdered sugar. Add one-half more cup of powdered sugar and then add a bit of milk. Alternately add sugar and milk until frosting is spreadable with spoon.
- Add half of the white frosting into one bowl.
- Add the other half of white frosting into another bowl and add 1 drop of red food coloring and mix well to form soft pink frosting.
- Frost large cookies with pink frosting.
- Frost each small cookie with white frosting and stick on slightly angled to the pink cookie at the bottom to form "Bunny feet"
- Stick one mini-marshmallow in the center of the pink large cookie to make the tail
- Add large pink candy in the top third of each bunny foot
- Add 3 small pink candies to the bottom of the foot to form the smaller bunny foot pads
- Allow to set 4-6 hours until the frosting hardens.
- Store in air tight container with wax paper in between layers
- Can freeze for up to one month